Wednesday, March 16, 2022

Thinking of You + Deepest Sympathy

Sympathy cards are the hardest to make ...... especially when they are for family & friends .....

It just goes to show how small the world is, Adelaide in particular!  

My Nephew married the Niece of an old school friend, Rossi, so I always maintained that it made us 'Aunties In-Laws'  LOL

We all went to Taperoo Primary School and here is a photo from our very first School Reunion in 2010 - in the Barossa

LtoR Front:  Di, Sharlene, Rossie
Back:  Anne, Diana, Me, Bronny, Kaye

and one of our School Reunions in 2012 in Victor Harbor ....
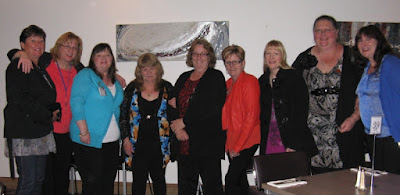
LtoR: Debbie, JulieO, Me, Rossi, DebbieC, Sharlene, Anne, Diana, Bronny

it seems like they were yesterday and forever ago .... both at the same time :(

Here we are in 2022 (those that could attend the funeral)
LtoR:  Me, DebbieC, Kaye, JulieR

RIP Roslyn Margaret Harrison - no longer in pain, reunited with loved ones.


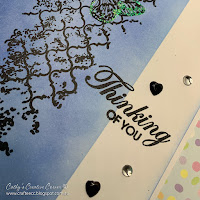
BLUE CARD:  White cardfront, sponged/blended blue background with right side masked off.  Kaisercraft 'Flutter' and 'Thinking of You' Sentiment stamped in Black StazOn.


black hearts & silver gems added on white section.  Kindy Glitz added to butterflies and cardfront edges defined with blue ink, cardfront mounted onto white card base.


PURPLE CARD:  White cardfront, sponged/blended purple background with top & bottom masked off.  Kaisercraft 'Botanical' and 'With Sympathy' Sentiment stamped in Black StazOn.


black hearts added on white section, Kindy Glitz added to butterflies and cardfront edges defined with purple ink, cardfront mounted onto white card base.


I find I keep going back to these Kaisercraft stamps - I have had them for as long as I can remember :)

Linking with:
BLUE CARD:  
Shopping Our Stash Weekly Challenge - 466 Spread Your Wings
PURPLE CARD:  
Retro Rubber - #RRCB178 - Anything Goes (stamp older than a year)
TicTacToe Challenge #152  - shades of purple/CAS/Sympathy


Cheers everyone .... stay safe and tell your family & friends you love them!


Sunday, March 6, 2022

Happy Birthday Sharon

It's my Sister-in-Law's birthday during February, around the same time as our Wedding Anniversary.  

We usually get together to celebrate as a family, and this year was no different other than it was a little bit later than normal!  But hey, we got there in the end!

I have been really trying to be more creative with my cards and trying new techniques - one such technique from Natasha Foote caught my eye :)  

In her video titled We can use WHATEVER you have Natasha shares a technique of placing multiple diecut stamped images close together then cutting them out in a heart shape using a heart die.  I don't have a heart die, but I was quite taken with the end result.

So using what I have on hand, I stamped and coloured in my images with Copics and then die cut them.  

As I didn't have a heart shape, I used an oval Spellbinders Die as my shape and placed all the die cuts accordingly.  A little touch of Kindy Glitz here and there and the empty spaces were filled in with some bling (of course).  As the card seemed a bit bare, I sponged the background to give the oval a bit more definition.


The sentiment is from Inkadinkado 'Cupcake' stamp set.
The sweet goodies are from Lawn Fawn 'Sweet Plushies'
Cardstock from BlueEdge Crafts.

Linking with:
Time Out Challenges: #208 Birthday Challenge

Friday, February 25, 2022

Let it Snow

Cut It Up - Guest Designer Spot #2 - Snowmen - February 25

Here is a card for my 2nd Guest Designer Spot for Cut It Up.  This particular challenge is sponsored by OddballArtCo and I have used Silly Chilly Stan #138 for my card.


I resized Silly Chilly Stan to fit on a DL size cardstock and printed with a Laser printer and hand coloured in the scarf & nose with watercolour pencils.  The sky/snow was sponged using a mixture of a few different 'blues'.


Lawn Fawn 'Let it Snow' sentiment from Magic Holiday stamped with StazOn Ganache and die cut with the inner circle of the large snowflake from the Magic Iris Snowflake Add On.  The Snowflake was die cut from some 'textured handmade paper' I have had in my stash for as long as I can remember .... just waiting for the perfect opportunity.


The sky looked a little bare, so I stamped some extra snowflakes with Stampin Up 'Snow Swirled' with 'Not Quite Navy' and added a touch of Kindy Glitz.  I also used Kindy Glitz at the bottom of the card to indicate snow on the ground - I am not entirely sure that idea was successful, but I can live with it.

I would like to link this card with a few challenges:

Happy Little Stampers' current challenge is Snowflakes, and whilst this card may be 'borderline' CAS, I will link it with Addicted to CAS anyway :)  and, the Peace on Earth Christmas challenge provided this really great picture for inspiration


The snowman and all the snow caught my attention :)  Living in Adelaide, we rarely get any snow, so I often dream of what a White Christmas would look like!

I am really quite pleased with how this card turned out and will be added to my 2022 Christmas Card Stash!

Thank you to Evelyn from the Cut It Up Challenge for asking me to be a Guest Designer, I really enjoyed myself!

linking with

Addicted to CAS - #214 - Snowflake

Sunday, February 20, 2022

Happy Birthday

Hi everyone

back again with another card using a 'new technique'.  I have been concentrating on using my stamps & dies that I have recently purchased .... and not packing them away so that they become NBUS (never before used schtuff) :)  

This is 'Take II' of a card made after watching a video from Natasha Foote on embossing vellum.  My previous card worked out okay, so I thought I would do another one.


First up, I ran vellum through the Cuttlebug using a Darice 'Ranunculus' embossing folder, and swiped all the raised bits with VersaMark Embossing Ink, then heat embossed with Gold embossing powder.   To attach the vellum without any noticeable 'sticky tape', I used some 'jac paper' (double sided sticky) to mount the vellum to the cardbase.

I stamped 'happy birthday' from 'Miss You Big Time' and diecut 3 layers, added a few bits of 'bling' in the center of the flowers, then gave the topper a black edge, like my previous card.


I used a lighter touch for the VersaMark ink this time, so the smudges & overflow was much less! 

Now I have a birthday card for the Sister-in-Law :)

I am quite pleased with this technique, although I am not sold on the black border :(


Cheers for now!


Best Wishes

Hi everyone

back again with another card.  I have been bitten by the 'new technique' bug and have been concentrating on using my stamps & dies that I have recently purchased .... and not packing them away so that they become NBUS (never before used schtuff) :)  

I have been watching a few videos on YouTube ...... and I came across one from Natasha Foote on embossing vellum, so I thought I would give it a try.  In Natasha's video, this technique is used for a feature flower, but I have used it for just a one layer background.


First up, I ran vellum through the Cuttlebug using the Stylised flowers embossing folder, and swiped all the raised bits with VersaMark Embossing Ink, then heat embossed with Gold embossing powder.   To attach the vellum without any noticeable 'sticky tape', I used some 'jac paper' (double sided sticky) to mount the vellum to the cardbase.

I stamped 'best wishes' from 'Miss You Big Time' and diecut 3 layers, added a 'bling' flower centre to one flower, then gave the topper a thin black edge.   I didn't like the thin black line, so I made it wider and took it all the way to the edge.


There was a little bit of gold embossing overflow/smudges, but I am reasonably happy with the card, so I think I will have another try at this technique ........... stay tuned for 'take II'

Cheers for now!

Linking this card with:
Happy Little Stampers - Anything goes with dies