Showing posts with label Snippets Playground. Show all posts

Monday, August 18, 2025

Happy Birthday Liam!

Another family birthday, this one for the Nephew, Liam.
 
I made the card using his favourite football team colours - Port Adelaide (Black, White & Teal)
 
I have wanted to try the 'split circle' technique for quite some time and I figure now was a good time to try.
 
I made a background using Cuttlebug Swiss Dots embossing folder and splattered with Distress Inks, then cut the cardfront with Waffle Flower A6 layers die.  I diecut several different size Spellbinders circles from offcuts of black, white & teal cardstock and set out having a play.  I discovered that cutting a circle in half is not as easy as it sounds  LOL but I managed. 
 
Circles were cut, glued together then arranged accordingly, but I made a mess with the ink somehow, hence the 'extra' bit to the left of the 'Happy Birthday' to cover up a blob.  Happy Birthday sentiment is from Stampin' Up, Voila! stamped onto another circle, then positioned accordingly.
 
Birthday balloons were cut from teal and placed on the cardfront. (unknown brand, bought at an Op Shop)
 

Cardfront was then attached to a 300gsm white card base.
 
I was not completely happy with the card, but time was against me.  I think I will have another play with these split circles at some stage in the future and see what I can come up with.
 
 
Linking with the following challenges:


AAA Birthday #76 - Sports (Fave Sports team colours)  Not sure if this qualifies or not, but will give it a shot!
Snippets Playground #513 -  offcuts of black, teal & White
All Sorts Challenge #830 - I Spy with a "B" - Balloons 
 
 
Thank you for visiting my blog today - I hope you have a good day.
Remember, any day doing something you love makes it a good day ;-)
Doing what you like is freedom. Liking what you do is happiness.


Monday, June 30, 2025

Hello Friend, Happy Birthday

I have another new card today.   This one is Card #2 of my CraftMad card swap.
 
Card #2 is an embossed card with layers.
 
It took a little while to settle on a design, but once inspiration hit, the card came together fairly quickly.
 
I rumaged through my Snippets container, and made a selection of rainbow colour strips of cardstock.  I ran them through the Cuttlebug using the 'hello' embossing folder.
  
The strips were then placed in rainbow order, trimmed to suit the placement of the sentiment and then mounted to cardfront with foam tape.
 
Honey Bee 'Bitty Buzzwords' stamps & dies were used.  
 
 
I diecut 'hello' & 'friend' in alternating black & white cardstock (black for the shadow, white for the text). 
Sentiment was also mounted with foam tape, and placed at the bottom of the cardfront.

  
'Happy Birthday' was stamped on the inside with Versafine Claire Onyx black.
 
 
Quite a fun cheerful card.
 
Linking with following Challenges:


Thank you for visiting my blog today - I hope you have a good day.
Remember, any day doing something you love makes it a good day ;-)
Doing what you like is freedom. Liking what you do is happiness.


Sunday, March 16, 2025

With Deepest Sympathy


They say the best way to get inspiration for cardmaking, is to do a bit of a tidy up! Well, that is pretty much true!  I did have a bit of a tidy up, and whilst sorting through my cardstock and re-organising the way it is stored, it led to a pile of snippets that also needed organising.

I now store my A4 cardstock in clear folders near my workdesk - they used to be stored all in one big basket, which made it difficult to sort through when looking for something specific.
 
AND my snippets are in an even bigger container now, and I will be making a concerted effort to use them all up!
 
I also sorted through some stamps, but that is a story for another post, later!
 
Whilst sorting through my stuff, I came across some beautiful cream pearl ribbed cardstock, which I thought would be perfect for either a Wedding Card or a Sympathy Card.  Now I know those two occasions are completely opposite each other, but as chance would have it ... I needed a sympathy card :( An old school friend lost her husband after a long illness.

So I set about making this card .... I wanted it to be simple, elegant and a little sophisticated as that would suit my friend Sharlene.
 
I turned to my go to dies and cut out some more shapes in gold and white using the Spellbinders, Be Bold Blooms die set.
 
The sentiment was designed by me and printed on the laser printer, then foiled in gold and diecut with Stitched Circle dies, and attached to cardfront with foam tape.


It was almost therapeutic arranging the floral elements in a pleasing manner, then they were attached directly to the cardfront using a combination of glue & foam tape to add dimension, finishing with a touch of 'bling'.
 
Who would have thought that using only two colours could be so effective!  I am quite pleased with how the card turned out .... now the hard part is here.... figuring out what to say on the inside. 
 
 
Linking with the following challenges:


Thank you for visiting my blog today - I hope you have a good day.
Remember, any day doing something you love makes it a good day ;-)
Doing what you like is freedom. Liking what you do is happiness.


Monday, January 6, 2025

Happy 50th Wedding Anniversary

Here is a card I made for my sister for her 50th Wedding Anniversary.
 
Using the Spellbinders Be Bold Blooms die set, I cut out a number of elements in Gold and white and set about making up some flowers.  The gold cardstock is some that I have had for quite a while now (read really old) and the last of it was in my 'offcuts' tray.  Some of the white pieces were left overs from my tray too!  This is my 'old' element for the Creative Inspirations Challenge.

I am finding the Be Bold Blooms die set is excellent for using up the smaller leftovers/snippets.
 
 
For the background, I embossed a 210gsm white cardstock with ProvoCraft 'Victoria' embossing folder and cut to size using Waffle Flower A6 Layer dies, then mounted the background onto a 300gsm white cardbase.
 
I used my computer to print up the sentiment using my laser printer, then foiled it using the Mini Minc & gold foil.  I then diecut the sentiment with one of my stitched circles dies. I am kinda pleased with how the sentiment turned out!


Sentiment was mounted to cardfront using 3d foam and then I played with the layout and layering of the flowers until I was happy with them, and finally placed some gems randomly around the cardfront.


I must say, I am really pleased with how this card turned out - all in all, a great afternoon crafting session!
 
Linking with the following challenges:


Thank you for visiting my blog today - I hope you have a good day.
Remember, any day doing something you love makes it a good day ;-)
Doing what you like is freedom. Liking what you do is happiness.


Saturday, November 16, 2024

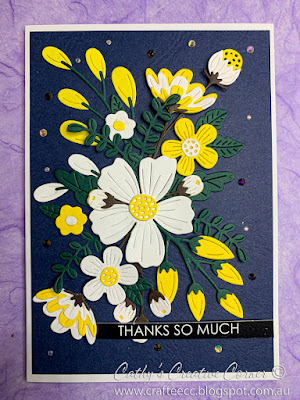
Thanks so Much

Having another play with my new Spellbinders Be Bold Blooms dies ..... 
 
I am really enjoying playing with these dies and die cuts.


I started with rummaging through my offcuts/snippets ..... and made a selection of colours that I thought might work well.  I die-cut the flowers and leaves multiple times in multiple colours and then set about making up various combinations of flowers, stems and leaves.

The background is left over from a previous card - I think that might be the last of the gorgeous dark blue. I used the Waffle Flower A6 Layers die to cut the cardfront to the perfect size.  

Playing with the layout is lots of fun. 
 
A final touch of bling added randomly around the card ...... if you call playing with the positioning for a good 5 minutes before deciding on final layout random LOL
 
I am really pleased with the way this card turned out .... especially considering it is made entirely with snippets/offcuts (except the white 300gsm cardbase).
 
Linking this card with the following challenges:

Thank you for visiting my blog today - I hope you have a good day.
Remember, any day doing something you love makes it a good day ;-)
Doing what you like is freedom. Liking what you do is happiness.


Sunday, October 27, 2024

Birthday Boys

We have a regular family gathering for all the August-September-October birthdays, usually some time in October, and this year was no different.

I made a two cards for the Great-nephews, Lucas (10) and Archie (8) - the boys are growing up so fast!

Card #1
Card #2
Both backgrounds were handmade by ink-blending a rainbow of colours, then put through the Cuttlebug with a different embossing folder for each card.  After embossing, I smudged some inks over the raised bits to make them stand out.
 
I then stamped and heat embossed the sentiment, then cut it out using the matching dies.  Sentiments were cut out multiple times, so that the sentiment could be layered together for added dimension.
 
The balloons & tags (Spellbinders)  were die cut using my stash of 'snippets/offcuts' and I used some very old 'letter stickers' to add the names and the numbers.

Two cards came together fairly quickly and easily :) 
 
Items Used:
Spellbinders Dies, Ranger Distress Inks & Altenew Inks
Cuttlebug machine, Provo Craft embossing folders (Number Collage & Happy Birthday)
 
Linking with the following challenges:
Card #1
Card #2


Thank you for visiting my blog today - I hope you have a good day.
Remember, any day doing something you love makes it a good day ;-)
Doing what you like is freedom. Liking what you do is happiness.


Sunday, October 6, 2024

World Cardmaking Day - 5th October 2024

I had a bit of a car accident on 17th September 2024. Thankfully, I was not hurt, but it is proving frustrating being without my car and relying on Mr Fixit to run me around.  I am not comfortable driving his car, which is a V6 Holden Commodore, as it is just so big.  My car is being repaired, so I am without a car for the next 8 weeks or so. 

Anyway .......  back to World Cardmaking Day :)

I think it is such a fun idea having a day dedicated to cardmaking  LOL so I took the opportunity to have a play with some of my recent purchases.
 
I have been keeping a lookout for Spellbinders Be Bold Blooms dies ..... usually they are over A$35 depending where you get them from, and with the added cost of postage, it makes it a very expensive purchase.   I was lucky enough to come across a great deal on Amazon - A$23 with free postage!  SOLD!


I started with rummaging through my offcuts/snippets ..... and made a selection of colours that I thought might work well.
 
I die-cut the flowers and leaves multiple times in multiple colours.


I then set about making up various combinations of flowers, stems and leaves.

Once I had finished that, I then sorted through my stash of cardstock for the background, and I finally settled on the dark blue that was in my 'off-cut' bin. 

My 'go to' cardbase is A6, which is half of an A4, folded in half.  I used the Waffle Flower A6 Layers die to cut the cardfront to the perfect size.  

 
Playing with the layout was lots of fun.  I chose to stick fairly closely to the sample in the packaging for my first layout, while I got familiar with the blooms.  I have some pre-foiled/pre-cut sentiments that I have had for absolutely ages and was quite pleased that one of them worked with the layout.
 
A final touch of bling added randomly around the card ...... if you call playing with the positioning for a good 5 minutes before deciding on final layout random LOL
 
I am really pleased with the way this card turned out .... especially considering it is made entirely with snippets/offcuts (except the white 300gsm cardbase).
 
Linking this card with the following challenges:


Thank you for visiting my blog today - I hope you have a good day.
Remember, any day doing something you love makes it a good day ;-)
Doing what you like is freedom. Liking what you do is happiness.


Thursday, July 25, 2024

Card Swap June

2 new cards from me today, this time swap cards for CraftMad Swappers
 
I was extremely late with my cards for June .......
 
 
At first, I struggled with deciding which 2022 card to case, as they were all so good!  but in the end, I couldn't go past this one by fellow swapper, Tracey.
 
 
Card #1
 
I set about making my own background with sponging varying shades of purple/pink inks, then I randomly stamped my Kaisercraft butterflies and heat embossed in gold.  I also heat embossed the edges of the cardfront with gold, then attached to cardbase with double-sided tape.
 
I die cut sentiment out of white cardstock, mounted onto a black shadow then attached to the cardfront with foam squares to add dimension.

 
Card finished off with some randomly placed bling!
 
 
Card #2
This card followed the sketch, and I took the opportunity to have a play with my Penny Black Stamps - Party Time set.

Images were stamped with black Versafine ink, then clear heat embossed.  I coloured them in with Altenew Crisp Dye Ink (Dusk) using a watercolour brush, and then inked the edges of the boxes.  Waffle Flower A6 layers dies were used to cut the different sized boxes :)  
 
 
The most perfect background Scrapbook DP came from my stash ..... I don't know how long I have had it LOL.  The text 'happy' was diecut twice from white cardstock and coloured with same ink used to colour my images, then mounted with foam squares.  
 
 
The boxes were placed according to sketch and layered with foam squares to add dimension.
 
I also made a 'thank you for being my swap partner' card :)
 
 
When you open it up, the image of the die cutting machine stays on the inside :)

 
I just 'love' the die cut of the paper trimmer!!
 
'Thank You' card was made entirely with offcuts/snippets of white & silver cardstock and some leftover scrapbook DP
 
Linking 'Thank You' card with the following Challenges
 
Linking Card#2 with the following Challenges:
TicTacToeCallenge-#252 (Middle Column - DieCut(s), Free, Any Sentiment) 
tttc#252


Thank you for visiting my blog today - I hope you have a good day.
Remember, any day doing something you love makes it a good day ;-)
Doing what you like is freedom. Liking what you do is happiness.


Sunday, June 2, 2024

Just for You

More time playing with the coneflower dies.  I am loving the different effect you get by changing the intensity of the ink blending over the different layers.
 
Once again, the Mood Board for Beautiful Blossoms has inspired my colour choices for the flower!


This card started with an ink-blended background that was masked off to create a frame within a frame.  Two different yellows were used, water splotches added, then set aside to dry.


The coneflower petals were cut from offcuts/snippetts, ink-blended using oranges & yellows then arranged/layered accordingly using liquid glue.
 
The leaves were die cut and a stem was cut manually, then ink-blended with two different greens and placed on the cardfront. 

I really like the way the petals fall over the edge of the yellow frame.


'just for you' sentiment was cut from some left over gold reflective cardstock (more snippets) and placed on cardfront which was then added to the front of the white 300 gsm cardbase.
 
I am loving this die set .......


Items Used

Dies - Amazon Coneflower Dies, Crafters' Companion Just for You
Inks - Ranger Distress Inks
Cardstock - 200 gsm white (cardfront), 300gsm white (cardbase)
Tools - Cuttlebug, Blending Brush
Extras - Glue, double sided tape, masking tape

Linking with the following Challenges:

Snippets Playground #481

Beautiful Blossoms #17 – Mood Board

Cut it Up #305 – Anything Goes

Shopping Our Stash #522  how does your garden grow


Thank you for visiting my blog today - I hope you have a good day.
Remember, any day doing something you love makes it a good day ;-)
Doing what you like is freedom. Liking what you do is happiness.