Showing posts with label allsorts. Show all posts

Monday, August 18, 2025

Happy Birthday Liam!

Another family birthday, this one for the Nephew, Liam.
 
I made the card using his favourite football team colours - Port Adelaide (Black, White & Teal)
 
I have wanted to try the 'split circle' technique for quite some time and I figure now was a good time to try.
 
I made a background using Cuttlebug Swiss Dots embossing folder and splattered with Distress Inks, then cut the cardfront with Waffle Flower A6 layers die.  I diecut several different size Spellbinders circles from offcuts of black, white & teal cardstock and set out having a play.  I discovered that cutting a circle in half is not as easy as it sounds  LOL but I managed. 
 
Circles were cut, glued together then arranged accordingly, but I made a mess with the ink somehow, hence the 'extra' bit to the left of the 'Happy Birthday' to cover up a blob.  Happy Birthday sentiment is from Stampin' Up, Voila! stamped onto another circle, then positioned accordingly.
 
Birthday balloons were cut from teal and placed on the cardfront. (unknown brand, bought at an Op Shop)
 

Cardfront was then attached to a 300gsm white card base.
 
I was not completely happy with the card, but time was against me.  I think I will have another play with these split circles at some stage in the future and see what I can come up with.
 
 
Linking with the following challenges:


AAA Birthday #76 - Sports (Fave Sports team colours)  Not sure if this qualifies or not, but will give it a shot!
Snippets Playground #513 -  offcuts of black, teal & White
All Sorts Challenge #830 - I Spy with a "B" - Balloons 
 
 
Thank you for visiting my blog today - I hope you have a good day.
Remember, any day doing something you love makes it a good day ;-)
Doing what you like is freedom. Liking what you do is happiness.


Thursday, August 7, 2025

Happy Purrthday

Another fun card for today.
 
The As You Like it Challenge asks us 'cats or dogs?'   LOL  it is definitely cats for me! 
  
 
Black 300gsm card base, with a marble DP.  
 
Uniquely Creative "Purrfect" cats stamped and hand coloured with Copics, then die cut, Sentiment stamped and diecut.  All elements added to cardfront with foam tabs.
 
 
A touch of bling added. 
 
A very clean and simple card for me .... not sure whether it needs something more or not :)
 

Linking with the following challenges:

  
As You Like it - Cats or Dogs   Oops, too late!


Thank you for visiting my blog today - I hope you have a good day.
Remember, any day doing something you love makes it a good day ;-)
Doing what you like is freedom. Liking what you do is happiness.


Thursday, February 13, 2025

I Love You

It's that time of year again :)
 
Our 43rd Wedding Anniversary on 13th February and tomorrow is Valentines Day.
 
I designed the card in Word for the layout - Text sentiment & an hourglass image from pngWing - which was printed onto gloss cardstock with a laser printer.
 
I then foiled the 'I love you' in RED, and the hourglass and the remaining text in GOLD.
 
I glued down some 'GORGEOUS' sprinkles I received in my Secret Santa Swap for CraftMad Swappers as the 'sands of time' - the little hearts are just perfect!  As soon as I saw them, I knew I was going to incorporate them into a card.  The white cardfront was then attached to a Kraft cardbase with foam tape.
 
The Cardz 4 Guyz Challenge this time round is 'clean and simple' and the Allsorts Challenge calls for romance or music.
 
 
The challenge over on Inkspiration is in collaboration with Color Hues Challenge using pink & red.  Now, I never thought that I would make a card for Mr Fixit using 'pink & red' ... but I think the subtle pink & red tones work!   The red foil 'I Love You' and the light pink & dark pink hearts in the sprinkles adds just enough colour to an otherwise 'all gold' card.
 
My Time to Craft asks us to use a theme of  'hearts'.
 
Linking with the following challenges:

 
Now, this is where I get honest, the above card is the second version, you see, I had great plans to turn this into a shaker card.
 
In the first version, I cut the inside of the hourglass away, added 3d foam tabs behind to make a pocket, then added the 'sprinkles', then attached it to the cardbase.   You guessed, it ..... I forgot to add the acetate!  DOH!   I had sprinkles everywhere!
 
So then I peeled off the foam, attached the acetate, then added back the foam and the sprinkles and attached it to a white base ... but it was a bit crooked and there was a misalignment; you could see the hourglass printed underneath .... and I mangled up the edges of the foil when I cut the aperture out... AND I spied a rogue triangle piece in the shaker area..... at that point I decided to do the card again and produced the card you see above.
 
Here is the first version of the card .... complete with crooked placement and the rogue 'triangle' piece in the shaker area.

I showed Mr Fixit the first version .......... he did say he liked the idea of the 'shaker card' and wouldn't have noticed the rough edges, nor the misalignment, nor the rogue triangle .....
 
 
Thank you for visiting my blog today - I hope you have a good day.
Remember, any day doing something you love makes it a good day ;-)
Doing what you like is freedom. Liking what you do is happiness.


Monday, December 23, 2024

Happy Birthday, Happy Anniversary, Happy Birthday

It's time for the in-laws birthday & anniversary celebrations.
 
Card#1 - Birthday card for Sister-in-law Rosa

I had a play with my Uniquely Creative Cake Builder Stamp & Die Set.  Cake elements were stamped on 210 gsm cardstock in Versafine Ink, hand coloured with watercolour pencils and cut out with matching dies.

 
The background stamp is Couture Creations 'Star Burst' stamped on 210 gsm cardstock with Versamark Ink and heat embossed with Holographic Embossing Powder that I have had in my stash for as long as I can remember - I don't use it very often, as it doesn't always stick very well, and tiny specks of glitter come off if you handle it too much :( The background was trimmed to make the cardfront, then added to 300gsm cardbase using foam tape. 

 
The cake elements were then layered strategically on the cardfront with a combination of foam tape & double-sided tape for added dimension.
 
Linking Card#1 with the following Challenges
 

Allsorts Challenge -Week 812/3 - use your dies


Card#2 - Wedding Anniversary Card

I used up some more of the gorgeous Spellbinders Be Bold Blooms die-cuts I had pre-cut in a previous crafting session.  I am loving this Blue/Yellow/White combination.
 
Card#3 - Birthday Card for brother-in-law Greg

I had some fun cutting out records and squares from my stash of colour cardstock and placing in a fun layout.  I love the sentiment .....
 
Linking Card#3 with the following Challenges
AAA Cards #280 - sketch - I have rotated the sketch


Thank you for visiting my blog today - I hope you have a good day.
Remember, any day doing something you love makes it a good day ;-)
Doing what you like is freedom. Liking what you do is happiness.


Sunday, December 22, 2024

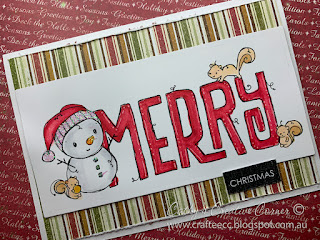
Noel, Joy, Merry.....

Here are are few more Christmas Cards I managed to make this year - quite pleased with myself!

I bought some digital images a while back from RAM Stamps (Rachelle Anne Miller) and I thought it was about time I used them.  I must say, they have been a pleasure to use and to colour in.
 
Card#1
RAM Christmas Noel Image printed onto 210gsm cardstock, coloured in with Copics, highlights with Kindy Glitz.  Handmade background ruling lines with Copics.  Centre panel cut with Spellbinders Deckle edge dies & edges highlighted with Kindy Glitz and added to cardfront using foam squares. 
 
Card#2
RAM Christmas Joy Image printed onto 210gsm cardstock, coloured in with Copics, highlights with Kindy Glitz.  Green DP used for a background.  Centre panel cut with Spellbinders Deckle edge dies & edges highlighted with Green Copics and added to cardfront using foam squares.

Card#3
RAM Christmas Merry Image printed onto 210gsm cardstock, coloured in with Copics, highlights with Kindy Glitz.  Striped DP used for a background with edges 'stressed' to add interest.  Centre panel cut with Rectangle Dies and added to cardfront using foam squares.
 
Card#4
RAM Australian Birds Image printed onto 210gsm cardstock, coloured in with Copics, highlights with Kindy Glitz.  DP used for a background.  Centre panel cut with 'scalloped edge' die and added to cardfront using foam squares. 
 
Card#5
I created a background in Photoshop, printed onto 210gsm cardstock, and foiled with 'Mini Minc' in Red foil.  The RAM Kangaroo Christmas Surprise image was printed onto 210gsm cardstock, coloured with Watercolour Pencils, highlights with Kindy Glitz.  Image was then fussy cut, and added to cardfront with foam squares.
 
Linking the following cards with the following challenges
 
Card#2
 
Card#3
 
 
Card#4
Critter Crazy Challenge #93 - Anything goes with a critter
 
Card#5


Thank you for visiting my blog today - I hope you have a good day.
Remember, any day doing something you love makes it a good day ;-)
Doing what you like is freedom. Liking what you do is happiness.


Tuesday, December 17, 2024

Ho Ho Ho, Merry Everything

Here is another card I made recently with the abundant supply of alphabet letters I die cut the other day!


I die cut a series of letters out of Plaid DP and layered onto white cardstock for dimension. 


I used my new 'T square' ruler to align the letters, before affixing with foam tape to red background cardstock.  Gold Peel Off stickers were randomly added to the background, 'Merry Everything' sentiment stamped on 210gsm white cardstock, cut out and added to red background with foam tape.  The background was then affixed to a white A6 300gsm cardbase.
 
AND .... we have another 'dancing' Santa :) stamped on 210gsm white cardstock and hand coloured with Copics, fussy cut with scissors, highlighted with Dimensional paint, then affixed with a wobble (see video below).


I have really enjoyed making this selection of Christmas Cards, even though the lettering took way more time than I expected to LOL
 
Linking with the following challenges:
As You Like it Challenge - Anything Christmassy
Creative Knockouts #536 - Time to be Merry 


Thank you for visiting my blog today - I hope you have a good day.
Remember, any day doing something you love makes it a good day ;-)
Doing what you like is freedom. Liking what you do is happiness.


Sunday, October 27, 2024

Birthday Boys

We have a regular family gathering for all the August-September-October birthdays, usually some time in October, and this year was no different.

I made a two cards for the Great-nephews, Lucas (10) and Archie (8) - the boys are growing up so fast!

Card #1
Card #2
Both backgrounds were handmade by ink-blending a rainbow of colours, then put through the Cuttlebug with a different embossing folder for each card.  After embossing, I smudged some inks over the raised bits to make them stand out.
 
I then stamped and heat embossed the sentiment, then cut it out using the matching dies.  Sentiments were cut out multiple times, so that the sentiment could be layered together for added dimension.
 
The balloons & tags (Spellbinders)  were die cut using my stash of 'snippets/offcuts' and I used some very old 'letter stickers' to add the names and the numbers.

Two cards came together fairly quickly and easily :) 
 
Items Used:
Spellbinders Dies, Ranger Distress Inks & Altenew Inks
Cuttlebug machine, Provo Craft embossing folders (Number Collage & Happy Birthday)
 
Linking with the following challenges:
Card #1
Card #2


Thank you for visiting my blog today - I hope you have a good day.
Remember, any day doing something you love makes it a good day ;-)
Doing what you like is freedom. Liking what you do is happiness.


Sunday, March 17, 2024

CardSwap - March - TicTacToe + Sketch

Time for my March Swap Cards for CraftMad - this time using a sketch + TicTacToe.

Card 1 - sketch + TicTacToe

For my first card, I started following the sketch, but as I played with it, the more I started following the TicTacToe as well.  In the end, I went with bottom row - neutral/ribbon/patterned paper.

First up, I stamped, coloured in and die cut some cats from the Uniquely Creative Purrfect stamp set, then placed them on some vellum circles cut with Spellbinders Circle dies.

Patterned paper was placed on the left side and white cardstock embossed with Dots using my Cuttlebug placed on the right side - a ribbon was used to cover up the join.  Vellum circles were then added to cardfront using double-sided tape.  To finish, cardfront edges were inked slightly to emphasis the edges, then added to the cardbase.
 
Linking this card with:
Allsorts Challenge #772 - Feathers or Fur
Shopping Our Stash #517 - Round and Round


Card 2

I played with some new stamps (new for me).  I recently received a prize in the mail from Christina of Flowers,Ribbons and Pearls.  Each Friday Christina has a giveaway for her followers and I was lucky enough to win in January and by February, the magazine & stamps were in my hot little hands!
 

Thank you so much Christina, and for the little extras in the package too!  you are most generous!
 
I was itching to have a play with these stamps - I usually struggle with cards for males and I think these stamps will really help with the creativity.

Following the sketch layout, I cut 3 circles and stamped them with some of the text/elements in StazOn ink.  I then used the 'road map' stamp and stamped that on some DP, then trimmed to size.  The 'tyre tracks' were stamped, then circles placed to follow the sketch layout.

The TicTacToe elements followed for this card were middle row:   masculine/die cut/ink.


Thank you for visiting my blog today - I hope you have a good day.
Remember, any day doing something you love makes it a good day ;-)
Doing what you like is freedom. Liking what you do is happiness.


Sunday, January 14, 2024

Happy Birthday

Happy New Year to you all!

Time for some NEW Birthday Cards.

 
I made my own background by lightly ink blending a few colours and stamping some musical notes several times in Black ink, which was then trimmed to size.  I have had the musical notes stamp for quite a few years, but this is the first time I have used it.

I die cut 'happy birthday' words & shadows from alternating black & white layers - layering the black shadow twice to add more dimension.

Background was attached to the 300 gsm card base using double sided 'jac' paper, then the sentiment was mounted with 3D foam.
 
I am quite happy with the way the card turned out, as this is a new technique for me. 
 
--oooo0oooo--

For the Card #2, I made my own background by ink blending a few different blues, spritzing with water and letting dry.  The I randomly stamped the cake from Stampin Up Voila in Versamark, then heat embossing.  It is amazing the difference a new stamp pad makes!  Now I just need to keep a look out for the refill bottles and not let the stamp pad dry out :)
 
I die cut 'happy birthday' words & shadows from alternating black & white layers - this time using the black words on a white shadow.


Background was attached to the 300 gsm card base, and the sentiment was mounted 3D foam.
 
I quite enjoyed my first 'real' crafting session for 2024, and I hope to spend more time in the craft room...... how about you?...... what are you hoping to do in 2024?
 
 
Linking with following challenges:
 
Card1
NBUS: Musical Notes stamp
Time Out Challenge #254:  New technique
My Time To Craft #525 - Use something new in your stash
All Sorts Challenge #763 - make your own background
 
Cardz 4 Guys #338 - Use something new from stash
All Sorts Challenge #763 - make your own background
 
Linking both cards with 
Cut It Up Challenge #295 - New Product/Technique


Thank you for visiting my blog today - I hope you have a good day.
Remember, any day doing something you love makes it a good day ;-)
Doing what you like is freedom. Liking what you do is happiness.


Wednesday, September 13, 2023

Sympathy Card

Hi everyone, thanks for stopping by and reading my latest post!

I have needed a few Sympathy cards of late ...... such a sad time for some of my friends and their families.  Over the next day or so, I will be sharing some of the sympathy cards I have made.
 
One of my friends I have known since about 1975, Gavin, recently passed away.  It was a bit of a shock, as he was only 66, but he had been experiencing some health issues of late.  
 
This card will be for his brother, Stephen.  Stephen was the person who introduced my husband to me, and Gavin was the person who pushed us to go on a few dates!  Thank you Stephen & Gavin, we have now been married 42 years and counting!
 
For me, the loss of an old friend hurts, but knowing he is no longer in pain is a source of comfort.
 
 
Stampin Up Heartfelt Thanks - my fave 2-step stamp set.  I have had this set for quite a while now (since 2015!  which goes to show the quality of the stamps!)

Background flowers were stamped randomly with VersaMark, then clear embossed.  Background was trimmed then attached to cardbase.  2-step Flower images were stamped onto white card front, using a 'The Stamping Buddy' to align images, trimmed and edges were distressed.  Card front was layered onto black cardstock, ribbon wrapped around cardfront, then cardfront was attached to background.  


'The Stamping Buddy' is another tool I have had for many years.  I remember thinking it was a bit on the 'expensive' side when I first bought it, but it has been the perfect tool for aligning wooden stamps, especially my collection of 2-step stamps from Stampin Up.

Linking With the following challenges:

ITEMS USED

Stampin Up Heartfelt Thanks, The Stamping Buddy, Stampin Up Ink, Stazon Ink, Clear Embossing Powder, VersaMark, Edge distressing tool


Thank you for visiting my blog today - I hope you have a good day.
Remember, any day doing something you love makes it a good day ;-)
Doing what you like is freedom. Liking what you do is happiness.