Showing posts with label dies. Show all posts

Monday, August 18, 2025

Happy Birthday Liam!

Another family birthday, this one for the Nephew, Liam.
 
I made the card using his favourite football team colours - Port Adelaide (Black, White & Teal)
 
I have wanted to try the 'split circle' technique for quite some time and I figure now was a good time to try.
 
I made a background using Cuttlebug Swiss Dots embossing folder and splattered with Distress Inks, then cut the cardfront with Waffle Flower A6 layers die.  I diecut several different size Spellbinders circles from offcuts of black, white & teal cardstock and set out having a play.  I discovered that cutting a circle in half is not as easy as it sounds  LOL but I managed. 
 
Circles were cut, glued together then arranged accordingly, but I made a mess with the ink somehow, hence the 'extra' bit to the left of the 'Happy Birthday' to cover up a blob.  Happy Birthday sentiment is from Stampin' Up, Voila! stamped onto another circle, then positioned accordingly.
 
Birthday balloons were cut from teal and placed on the cardfront. (unknown brand, bought at an Op Shop)
 

Cardfront was then attached to a 300gsm white card base.
 
I was not completely happy with the card, but time was against me.  I think I will have another play with these split circles at some stage in the future and see what I can come up with.
 
 
Linking with the following challenges:


AAA Birthday #76 - Sports (Fave Sports team colours)  Not sure if this qualifies or not, but will give it a shot!
Snippets Playground #513 -  offcuts of black, teal & White
All Sorts Challenge #830 - I Spy with a "B" - Balloons 
 
 
Thank you for visiting my blog today - I hope you have a good day.
Remember, any day doing something you love makes it a good day ;-)
Doing what you like is freedom. Liking what you do is happiness.


Friday, June 6, 2025

Thinking of you today and every day

I have been a bit sidetracked in the craft room of late, but sadly, I was in need of a sympathy card to give to my sister.  Her mother-in-law, who turned 90 in February this year, passed away on Saturday night.


This is an Altenew stamp & die set - Wild Flora - flowers were stamped with Versafine Onyx Black and heat embossed with Zing Clear embossing powder.  I hand painted the flower & leaves using Altenew Inks.
 
I recently purchased some stencils and blending brushes from Amazon and was keen to have a bit of a play.
 
I made the background using one of the stencils with a blending brush and lightly blended using Altenew Ink in the centre.  When mounting the background onto the matt, I thought it got a little lost, so I ink blended the edges as well, and added a few splatters.  I then stamped the sentiment directly onto the background.  
 
The background & matting were cut using Waffle Flower A6 layer dies and layered onto an A6 300 gsm White Cardbase.  
 
I layered the background onto the purple matting, then layered the purple matting onto the white cardbase.  The flowers were then positioned on the front in a pleasing manner with foam tabs to add dimension.
 
Linking this card with a few challenges
 
TicTacToe #272 (centre column - layers /Free/ Floral/foliage
 

Just Add Ink #754 - Choose Two - DieCut-Flower-Ribbon - I chose DieCut/Flower
 
Just Us Girls #778 - Die Week - Layers - I used several dies to make up multiple layers


Cut it Up #331 - anything goes (with a die)
 
 
Thank you for visiting my blog today - I hope you have a good day.
Remember, any day doing something you love makes it a good day ;-)
Doing what you like is freedom. Liking what you do is happiness.


Wednesday, April 2, 2025

Thinking of You | Hello Sunshine | Best Wishes

I can't believe just how fast the year is going ..... here we are in April already!

It's Autumn here in Australia and I think this is my favourite time of the year.  Nice sunny days, blue skies, cool nights - perfect!
 
I have some more cards to share, as part of my CraftMad Swap group.
 
We had to make 2 cards - Card #1 a 'silhouette' card, and Card #2 a fun fold concertina card.
 
Card #1a - Thinking of You
I started by making my own stencil/mask using one of my Spellbinders Oval dies and ink blending a rainbow of colours in a diagonal pattern directly onto the cardbase.  I splashed some water onto the rainbow area, to add some interest, and then dried off with my heat gun.  A selection of silhouette stamps (from Amazon) were stamped in Versafine Onyx pigment ink directly to the cardfront.  I ummd & ahhhd over whether or not to stamp the sentiment and add it as another layer, but decided against it and ended up stamping the sentiment directly to the cardfront as well.
 
A final little touch of bling completed the card.
 
I actually enjoyed how this card came together, I made another one!  I believe it is called a 'two-fer'
 
Card #1b

I followed the same process as the previous card, but this time made my own stencil/mask using one of my Spellbinders Circle dies and ink blending a rainbow of colours from the centre outwards directly onto the cardbase.  I love the way it looks like the glowing sun.  I splashed some water onto the rainbow area, to add some interest, and then dried off with my heat gun.  A selection of silhouette stamps (Creative Place - Islandia) were stamped in Versafine Onyx pigment ink directly to the cardfront.  Sentiment was stamped directly onto the cardfront as well.
 
A final little touch of bling completed the card.
 
I was very pleased with how both of these cards turned out.
 
Linking Card #1a with the following challenges:
AAA Cards #287 - Silhouette +1  #1a = Geometric Shapes,  #1b = Landscape
 
 
----oooo0oooo----
 
Now onto Card #2 - a fun fold 'concertina' card
 
Well, I think you can guess what I'm going to say next right?   NOT a fun fold at all! 
It took me a while to decide on which 'concertina' card I was going to make, but I settled on one that had quite a few videos on YouTube and several different bloggers seemed to have a lot of fun making it. 
 
Even though I watched several tutorials, who made it look so very easy, I struggled - both with the construction and the end design of the card.

 
I took notes on the various measurements and started to cut - I settled on some double sided DSP that has been in my stash for a while - I think it is Kaszazz - and some co-ordinating 12x12 cardstock.
 
A rectangle using the other side of the DSP was added to a black matt and added to the cardfront.  The large sentiment was stamped and layered twice to add dimension, then added to a square green DSP front panel matted with black.   MFT Adorable Elephants Butterfly and heart stamped and a touch of bling completes the front.

 
Now despite my very careful cutting and layout plan, I still managed to muck it up!  I had intended for the the 'green gingham' to be the inside of the card and the smaller section to use the lighter paper .... oops!
 
Anyway ..... once I had got my valley folds & mountain folds sorted, I struggled to decide what to do with the inside.  I was going to leave an inside panel blank to write a greeting, but there wasn't really enough room to do that, I ended up stamping the inside panels with the cute little hearts and dotted 'flight path' over some cute little daisies.  In the end, I added a white panel on the back of the card for a personal note.
 
Here is a top view of the concertina card.
 

I really struggled with this one ..... an awful lot of wrangling, for not a lot of reward LOL
 
Anyway, I hope my swap partner likes the cards I have made - I will be sitting out the swap for April - I have had my fill of the 'fun fold' cards ................. they are NOT FUN!


Thank you for visiting my blog today - I hope you have a good day.
Remember, any day doing something you love makes it a good day ;-)
Doing what you like is freedom. Liking what you do is happiness.


Sunday, March 16, 2025

With Deepest Sympathy


They say the best way to get inspiration for cardmaking, is to do a bit of a tidy up! Well, that is pretty much true!  I did have a bit of a tidy up, and whilst sorting through my cardstock and re-organising the way it is stored, it led to a pile of snippets that also needed organising.

I now store my A4 cardstock in clear folders near my workdesk - they used to be stored all in one big basket, which made it difficult to sort through when looking for something specific.
 
AND my snippets are in an even bigger container now, and I will be making a concerted effort to use them all up!
 
I also sorted through some stamps, but that is a story for another post, later!
 
Whilst sorting through my stuff, I came across some beautiful cream pearl ribbed cardstock, which I thought would be perfect for either a Wedding Card or a Sympathy Card.  Now I know those two occasions are completely opposite each other, but as chance would have it ... I needed a sympathy card :( An old school friend lost her husband after a long illness.

So I set about making this card .... I wanted it to be simple, elegant and a little sophisticated as that would suit my friend Sharlene.
 
I turned to my go to dies and cut out some more shapes in gold and white using the Spellbinders, Be Bold Blooms die set.
 
The sentiment was designed by me and printed on the laser printer, then foiled in gold and diecut with Stitched Circle dies, and attached to cardfront with foam tape.


It was almost therapeutic arranging the floral elements in a pleasing manner, then they were attached directly to the cardfront using a combination of glue & foam tape to add dimension, finishing with a touch of 'bling'.
 
Who would have thought that using only two colours could be so effective!  I am quite pleased with how the card turned out .... now the hard part is here.... figuring out what to say on the inside. 
 
 
Linking with the following challenges:


Thank you for visiting my blog today - I hope you have a good day.
Remember, any day doing something you love makes it a good day ;-)
Doing what you like is freedom. Liking what you do is happiness.


Wednesday, March 12, 2025

Thanks, To Someone Special

More time in the craftroom saw me playing with a new to me card style - a 'Fun Fold Tower Pinwheel card'.
 
Card#1
This card was part of the February swap for Craft Mad Swappers - and once again, I was so very late in making my card, and sending it.
 
I really struggled with the design aspect of this card - ultimately working out 4 'cardfronts'  LOL
Altenew stamps stamped & heat embossed, watercoloured in with inks and cut with matching dies, Sentiment 'thanks' diecut in black, with the shadow in white, and attached to 'front' with foam tape. 
 
Inside section to write a personal greeting.  Altenew stamped inside the card.
Once a 'design' came to mind, then it was just a matter of 'fudging' the dimensions.  Kaisercraft Butterflies stamped on another panel on the inside.
More Kaisercraft Butterflies stamped on another panel on the inside.  I can't say it was my finest work, but I am glad I took the challenge and didn't let it defeat me.  Although I can say that the 'Fun Fold Tower Pinwheel Card' was most definitely NOT FUN and will not be on my 'to do list' again!
 
Card#2
The next swap card, was quite easy - we had to use something from our Secret Santa present.  I chose the gorgeous sequins & sprinkles to make a shaker card.
 
Penny Black hedgehog from 'Party Time' stamped and coloured in with Copics.  Balloon diecut positioned and cut out to make the shaker part. Finished off with a cute little bow that has been in my stash for a very long time!
 
And of course, the 'Thank You' card I make for all my swap partners - the die cut of the die cutting machine is actually on the inside of the card :) 

 
Linking Card #2 with the following Challenges


Thank you for visiting my blog today - I hope you have a good day.
Remember, any day doing something you love makes it a good day ;-)
Doing what you like is freedom. Liking what you do is happiness.


Tuesday, January 28, 2025

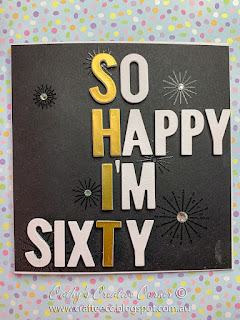
So Happy I'm Sixty ...

Time for another card   ......

This one is for my Sister-in-Law Sharon .... it's her 60th birthday
 

I got out my Alpha dies and cut a series of letters in white cardstock with 3 layers each, then I cut a selection of  'special' letters in gold.   Letters were set aside while I worked on the background.
 

For the background, I stamped some 'fireworks' in strategic positions on a black square cardfront in VersaMark and clear heat embossed, then attached to the 300 gsm white square cardbase.

 
'So Happy I'm Sixty' was strategically placed and attached to cardfront with foam tape.  Some of the letters were a bit fidly, but it is so worth it!
 
I was able to use my new T-square ruler to line up all the letters - I really don't know why I waited so long to get me one of these rulers, but I am so glad I did now.
 
 
Finished off with a sprinkling of gems.  
 
As You Like It Challenge asks us which is our favourite .... gems or pearls?  I would have to say gems!  I do use Pearls, but only occasionally (usually for a wedding card).

 
Time Out Challenges #280 is Fave thing to do in January - for me it is spending time in my craft room with the cricket on (or a fave movie) in the air conditioning as it is usually far too hot to go outside.
 
Creative Inspirations asks us to use something 'new' - my new T-square ruler.  


Creative Knockouts challenge #539 calls for 'Something to say' - use a sentiment - I think the card says it all!  LOL
 
Simon Wednesday Challenge is asking for something 'funny/punny' - I think my card fits the bill!
 
 
Items Used:

STAMPS:  Sugar Pea Cheers to You

DIES:  Amazon Alpha Dies

INK:  VersaMark

CARD STOCK:  Blue Edge Crafts Cardstock – White/black 300 gsm, White Linen 250 gsm, matte gold

EMBELLISHMENTS:  Blue Edge Crafts Bling/Gems

TOOLS:   Cuttlebug, Print Blocks Emboss It Heat Tool, T-square ruler


Thank you for visiting my blog today - I hope you have a good day.
Remember, any day doing something you love makes it a good day ;-)
Doing what you like is freedom. Liking what you do is happiness.


Monday, January 6, 2025

Happy Birthday my incredible friend

Another crafting session, and another birthday card for an incredible friend.


Using the Spellbinders Be Bold Blooms die set, I cut out a number of elements in white and ink blended using blue to add interest and dimension to the flowers, and ink blended with green for the leaves.
 
 
I played around with the layout and layering of the flowers until I was happy with them, and then added them directly to the 'Leathergrain' cardbase.  To finish off, I placed a lucky 'ladybird' on a leaf and some gems randomly around the cardfront.
 
I couldn't decide which sentiment to use, so I ended up with none, but I did write a birthday message on the inside.  
 
Linking with the following challenges:
Beautiful Blossoms Challenge - Anything Goes - Optional Mood Board (I picked the 'blues')


Thank you for visiting my blog today - I hope you have a good day.
Remember, any day doing something you love makes it a good day ;-)
Doing what you like is freedom. Liking what you do is happiness.


Sunday, January 5, 2025

Cheers - celebrate the New Year

With the Cricket on the TV, I get to spend some time in the craft room ...........
Mr Fixit is happy, I'm happy!


Using my own handmade stencil cut with Spellbinders circle dies, I made my own background by ink blending some random 'bubbles' on 210gsm cardstock, highlighted with white gel pen for the background, which was then trimmed with Waffle Flower A6 layer dies, and added to Green 300gsm cardbase.
 
SugarPea 'Cheers to You' Champagne bottle and glasses stamped in black and clear heat embossed, hand coloured with Copics, then die cut with matching dies, placed strategically on the cardfront with foam squares.  
 
Sentiment 'Cheers' stamped directly onto background in black and clear heat embossed with a final touch of Kindy Glitz added to bubbles for sparkle.
 
Linking with the following Challenges:

Sweet Stampin' Challenge Blog - Something New (celebrate the New Year)
My Time To Craft #550 - Something New (celebrate the New Year)
Time Out Challenges #279 - New Beginnings (New Year)
 

Thank you for visiting my blog today - I hope you have a good day.
Remember, any day doing something you love makes it a good day ;-)
Doing what you like is freedom. Liking what you do is happiness.


Saturday, December 28, 2024

Happy New Year

Time for another crafting session!  The Cricket is on the TV, air-con on, nibbles and wine is flowing ... what more could a girl want!
 
I am very late with my December swap cards for CraftMad Swappers :)

Card#1 - Merry Christmas
 
Using a Kraft cardbase, ribbon was added across the middle with glue, Scrap Boys 'Christmas Day' DP was die-cut using WaffleFlower A6 Layer dies and added to cardbase.  KaiserCraft Christmas Tree was stamped on green cardstock, heat embossed with VersaMark & clear embossing powder, then die-cut with a slightly smaller Waffle Flower A6 Layer die.

A final touch of bling added at bottom of card.   I couldn't find the right sentiment stamp, so I used my new T-square ruler and wrote it by hand.
 

This card was inspired by a 2016 Sketch from my CraftMad swap group.


Card#2 - Happy New Year
 
Using my own handmade stencil cut with Spellbinders circle dies, I ink blended some random 'bubbles', highlighted with white gel pen for the background, which was then trimmed with Waffle Flower A6 layer dies, and added to Navy cardbase.


SugarPea 'Cheers to You' Champagne bottle and glasses stamped in black and clear heat embossed, hand coloured with Copics, then die cut with matching dies, placed strategically on cardfront with foam tabs.  Gold PeelOff stickers '2025' added, and a final touch of Kindy Glitz added for sparkle.

This Card was inspired by the CraftMad Swappers December TicTacToe - Diagonal Down L-R - Numbers, Gold, Sparkle


Linking Card#2 with the following challenges:


Thank you for visiting my blog today - I hope you have a good day.
Remember, any day doing something you love makes it a good day ;-)
Doing what you like is freedom. Liking what you do is happiness.