Showing posts with label acetate. Show all posts

Monday, December 8, 2025

White on White Christmas

more swap cards for my CraftMad swappers group
 
This Christmas Card swap was a 'white on white with a tag' swap.   I confess, I really struggled with an idea for this one.  It took several days to come up with a design that I thought fitting of a 'white on white' challenge, and it was very late getting to the recipient.
 
Cuttlebug to the rescue with some Christmas Trees die cut, and an aperture cut from the front of a card to make a window.  There is such a gorgeous amount of texture in this card. 

 
And of course, the matching tag!

I have to wonder why I am drawn to snowflakes when making Christmas Cards ..... here in South Australia, we don't have snow .... if it does snow in winter (July/August) it makes front page news!  LOL
 
And a Gift Card Holder - this was created using a prize I won from Christina, of Flowers, Ribbons and Pearls - Christina was most generous in sending it to me, even though I was in Australia and she is in the UK.  This is the second time I have used the die set - the first time was used to hold a small present, but I forgot to take photos.  So thank you Christina, I will be using my prize again very shortly.
 
Sadly, my Gift Card Holder does not fit a gift card!!  Note to self:  check measurements before committing to design.  LOL  It may not fit a gift card, but it will fit some Cash ..... everyone knows, Cash is King!  and it is perfect for holding special small presents.
 
 
Linking with the following challenges:
AAA Cards #305 - white on white (not sure if the card is CAS, but the matching Gift Tag is :) )
Christmas Kickstart Challenge - Anything Christmassy Goes 


Thank you for visiting my blog today - I hope you have a good day.
Remember, any day doing something you love makes it a good day ;-)
Doing what you like is freedom. Liking what you do is happiness.


Thursday, February 23, 2023

Let's Celebrate

It is incredibly hot here in Adelaide this week - we have had several days of  between 35C-41C (95F-106F) so we have been inside, with doors and windows/blinds closed.  Mr Fixit has been on his computer researching a new bed for us and I have been in my craft room, having a play.
 
It was quite fun making a card with no specific person in mind .....  this card has been inspired by some of my favourite challenge blogs.
 
 
To make the background, I used a stencil I had made myself with Spellbinders Circles & Acetate, and used a blending brush & inks to make 'bubbles', randomly positioning the stencil.  Each bubble was highlighted with a white gel pen.  Background was then trimmed and placed onto Burgundy cardstock, which was then placed onto a white A6 cardbase.

Using StazOn Ganache (a nice dark brown/black ink, less harsh than black) I stamped the Champagne bottle & glasses on white cardstock and coloured with copics.  Bottle & glasses were die cut 3 times and layered together, then placed on cardfront and highlighted with Kindy Glitz/Stickles, Dimensional Magic & Dew Drops.
 
Sentiment 'Let's celebrate' stamp is from Ultimate Crafts (Magazine)
 
I am quite pleased with how this card came together, it was just so nice to sit and have a play.
 
Top 3 Winner AAA Birthday


--oo0oo--
 
Linking With the following challenges:


AAA Cards Challenge has asked us to use circles.
 

AAA Birthday Challenge is to use a stencil.


 Just us Girls Challenge has a mood board (I was inspired by some of the colours) 

 
As You Like It Challenge is your 'favourite stencil or freestyle background'   I have started making my own handmade backgrounds of late, and I must say I am enjoying it!
 
ITEMS USED
Stamps/Dies:  Champagne bottle & glasses, Spellbinders Circles, Sentiment
Inks:  Distress Inks, Copics, white gel pen, StazOn Ganache
Tools:  Cuttlebug


Thank you for visiting my blog today - I hope you have a good day.
Remember, any day doing something you love makes it a good day ;-)
Doing what you like is freedom. Liking what you do is happiness.


Monday, October 17, 2022

Happy Birthday

I created a fun shaker card for the niece's birthday.

First up I made up a handmade background - with inking/smooshing and blotting - I think it has become my favourite technique this year - such a versatile technique being able to chose particular colours; some of which were chosen from the Just Add Ink #625 Inspiration Photo.


I then used one of my big balloon dies and cut out from the card front & the front layer of the card base.
Acetate was placed on the front, added 3d foam around the aperture and placed some gems and sprinkles in the well of the shaker section.  I added acetate to the back of the card front and placed over the top of the card base.


Sentiment 'happy birthday' stamped & die cut 3 times then layered together before being placed over the balloon.  A nice gold ribbon to add the final touch.

I forgot that the verse would show through the card, so I added a verse on the back :)  

I am having a lot of fun with figuring out the best way to make shaker cards .... some ways are more successful than others.


Linking with:
AAA Birthday Challenges - #42 A Favourite technique
Happy Little Stampers October Challenge - Anything Goes with Dies
Just Add Ink - #626 - Photo inspiration - colours of flowers


Thank you for visiting my blog today - I hope you have a good day.
Remember, any day doing something you love makes it a good day ;-)
Doing what you like is freedom. Liking what you do is happiness.

Saturday, October 1, 2022

Naughty or Nice?

Working on my Christmas Card stash .....

I was quite taken with a card by Karen McKibbin I saw on the Paper Rose Blog - so I thought I would try a 'new to me' technique with Acetate.

I stamped and coloured in a Christmas Tree, then cut out two trees with the matching dies and layered the two trees together.

I stamped some 'pine branches' on spare cardstock and used them for the top and bottom.


I attached some Go Press Foil on the top & bottom edges using double sided tape, then attached them to the acetate.  For the inside of the card, I embossed some white cardstock with 'Swiss Dots' embossing folder, the very first embossing folder I bought way back when I got my Cuttlebug.


I highlighted the tree with some kindy glitz and Dimensional Magic, then added the sentiments using 3d foam.

It was quite a challenge making up this card, and I would like to make another one, but this time take a bit more care with my measurements LOL

Linking with:
ABC Christmas Challenge "S or T" - T for Tree
Time Out Challenges #223 Photo Inspiration 'Christmas Tree'
Winter Wonderland Christmas Animals


Thank you for visiting my blog today - I hope you have a good day.
Remember, any day doing something you love makes it a good day ;-)
Doing what you like is freedom. Liking what you do is happiness.

Saturday, July 30, 2022

Happy Birthday Shaker

Slowly getting my cardmaking mojo back again :)

I started making a birthday card for my nephew, but I think this one turned out a bit girly, so it will go in my stash.


I used up another one of my handmade backgrounds .... ink smooshed & dabbed with water.  The cardstock has a texture to it, so it made for an interesting result.

Spellbinders Circle die used to cut out centre, clear acetate placed behind opening.  Various sequins & scatters added.  I love the cheeky smiley face!

Happy Birthday sentiment stamped with Distress Ink, Mowed Lawn & die cut 3 times, then layered and placed over aperture.


Linking with:


Thank you for visiting my blog today - I hope you have a good day.
Remember, any day doing something you love makes it a good day ;-)
Doing what you like is freedom. Liking what you do is happiness.
Friday, November 25, 2016

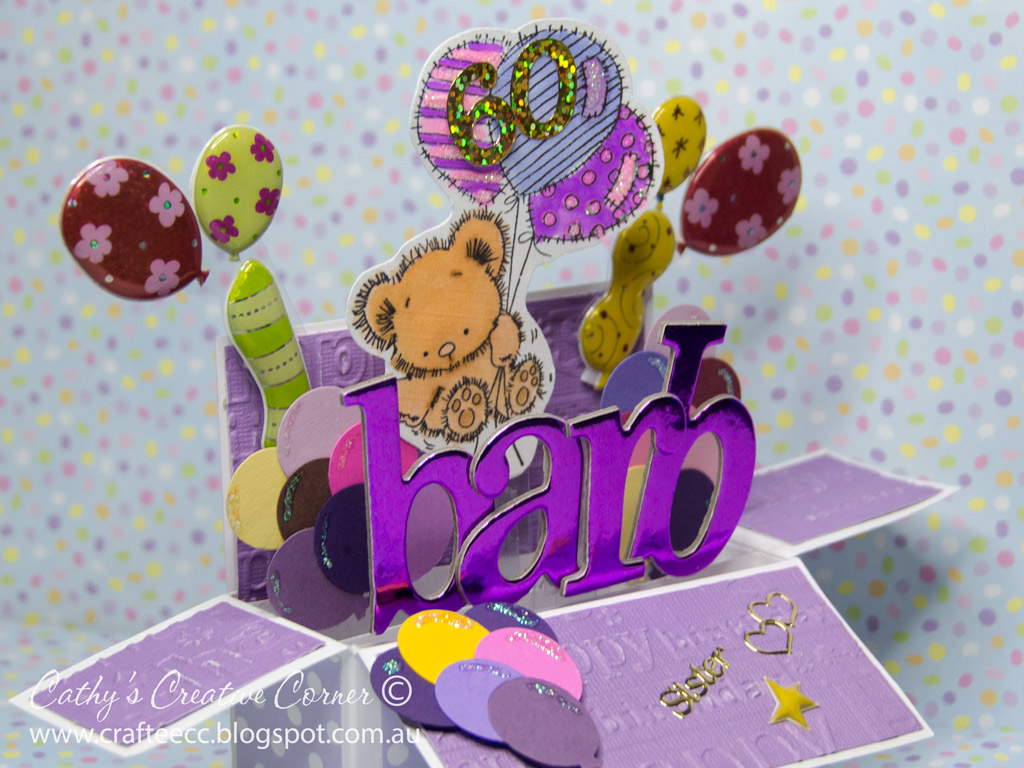
Happy Birthday to my Sister, Barbara

It will be my sister's 60th Birthday on 29th November 2016

I wanted to make a really special card for her, so I started searching for inspiration during October.  My search was fruitless :(  each day I was getting more and more frustrated that 'the perfect card' was not jumping up at me.

I have been admiring the 'card in a box' cards for quite some time and thought it was about time I bit the bullet and tried something completely new.

So with the help of Mr Google & Mrs YouTube, I settled on a basic design.  Once I got the construction of the box done, it was time to embellish :)  I had chosen a basic theme of balloons and just gathered everything I had to do with balloons - finally getting to use a Lili of the Valley stamp I purchased in January 2014

It was a lot of fun pulling this together, even though it took several days.


I had the puffy balloon stickers from the $2 shop for ages, and I can't remember when I actually purchased the purple letters, but I would have had my sister in mind as purple is her favourite colour.


Lots of very old things from my stash were used for this card - as mentioned earlier, the Lili of the Valley Stamp was bought in 2014, the balloon punch was one of the first punches I bought when I first started cardmaking back in 2005, the ever faithful purple bazzill cardstock has been around for at least 10 years - I think it is my last sheet of purple!


And ofcourse, the obligatory Kindy Glitz

white cardstock and gold stickers were from BlueEdge Crafts/Sticker Store


Linking with:
Daisy Chain Challenges - #2 All that Glitters
Sunny Day Crafting - #24 Anything Goes


Thank you for visiting my blog today - I hope you have a good day.
Remember, any day doing something you love makes it a good day ;-)

Doing what you like is freedom. Liking what you do is happiness.

Monday, September 2, 2013

UnstampaBelles Challenge # 27 - Using Scraps or Old Stash - PLUS A new toy - well new for me ;-)

Challenge #27 for UnstampaBelles is up and running and this month we are asked to use up our scraps or old stash!
Our sponsor this month is
my goto craft forum

Please remember .............
Any form of paper creation will be accepted as long as NO STAMPS (Digital or Rubber) have been used.  Due to graphic technology any entry with a graphic image will be subject to the Design Teams' discretion and we will contact you if we feel the entry does not meet the ethos of our challenge blog.
For further information, see our rules here.

The September challenge closes Friday, 4th October 2013 and Winners will be announced Monday, 7th October 2013 (yippee, on my Birthday) - Remember we are working on Aussie Time.

Just as a reminder, our current Design Team is as follows, please feel free to visit and say hello ;-)

Current Design Team Members - July - December 2013
Beth - Design Team Member since January 2012 and is also a member of CraftMad
Cathy(me) - Design Team Member since inception and is also a member of CraftMad
JanR - Design Team Member since January 2012
Lauren - Design Team Member since July 2012
Merry - founder of Unstampabelles and member of CraftMad
Sarah -  Design Team Member since July 2012
Susan - Design Team Member since January 2012

Now onto my paper creation.
I got a Scor-Pal recently ;-), yeah, I know, I must be the last person I know to get one .................. and I love it!
I grabbed some scrapbook papers, acetate and my Cuttlebug and Spellbinder dies, and this is what I came up with ;-)
This is the first thing I made with it - in 10 minutes flat!
square box with clear lid

First tryout of new toy

Because it was a test, I grabbed some old scrapbook papers - I used a fresh sheet for the base, but a scrap piece I had miscut for a card was used for the lid, and the acetate is borrowed from where I used to work - I won't say where, but since I have not worked there since some time in 2006, I think it counts as OLD STASH ;-)  The centre hole was cut using the Cuttlebug and Spellbinder Circle die.

Interestingly, the circle spellbinder dies were one of the first Nestabilities dies I bought way back in 2009 - I remember thinking when I purchased the Cuttlebug .... "I hope I use this thing a lot"  because it was quite expensive - $100.  I still use it today, at least once a month, sometimes more!

The Scor-Pal site has heaps of projects - the box I made can be found HERE
I can see some great Christmas boxes coming up in the near future ;-)
If you want a metric Scor-Pal, BlueEdge Crafts have them HERE


Thank you for visiting my blog today - I hope you have a good day.
Remember, any day doing something you love makes it a good day ;-)

Doing what you like is freedom. Liking what you do is happiness.

Monday, October 17, 2011

Halfway mark for UnstampaBelles Challenge #4 - Autumn

We are halfway through the month for our UnstampaBelles Challenge - where did that time go?

In the hope of inspiring you to try something different, here is another card made with NO STAMPS


Cardstock, acetate, DP, stickers from Blue Edge Crafts
Embellishments on front were from my stash - I think they may have been Jolees ;-)


Sunday, October 10, 2010

Craft Mad September Card Swap completed

The card swap for September over on CraftMad has been completed.

I have received some beautiful cards from Kaye, but need to wait for batteries to charge for the camera and will post pics of Kaye's cards shortly.

Here are the cards I made for Kaye

Acetate strip stamped and coloured from behind, run through Xyron label maker, glitter sprinkled on back, then panel glued to tissue paper, then layered on hand torn background paper, then placed on purple cardstock.  This technique is from a class I did years ago, and always looks impressive!

Snowglobe designed by me and cut out using CraftROBO.  Tree shape decorated with gold stickers, inside of card sponged with inks and kindy glitz. 


A4 acetate sheet cut in half and folded to form card base.  Nestabilities labels used to create panels, Flourishes irises heat embossed and has coloured with watercolour pencils.  Inside card, panel has been duplicated to give you somewhere to write greeting.

Saturday, July 18, 2009

Cuttlebug Be Inspired 40

Over on CuttlebugBeInspired#40 there is another great sketch!

White cardstock embossed with diamonds pattern. Whenever I look at this pattern, I always think of golf - so it just had to be a golf card! Sketch was rotated and put on a C6 size card.

Gold stickers of golf bag & clubs placed on acetate and raised with 3D mounting tape. Acetate attached using brown brads. Golf ball stickers used as embellishments.

I am not too sure on my choice of ribbon - I think I like it??

I do like the nice clean look!

Saturday, June 20, 2009

Cuttlebug Be Inspired 36 - Father's Day

A new cuttlebug challenge is up CBI36 with a theme of Father's Day. Being in Australia, our Father's Day is not celebrated until September, so it is nice to get an early start!
Black leathergrain card has been layered with DP, bazzil bling cardstock. Cuttlebug has been used to cut rectangles & squares and to emboss the 'golf ball'.
Gold stickers used to highlight rectangle and to add sentiment. Golf buggy sticker placed on handmade paper and acetate and mounted with 3D foam.

I get the majority of my stickers from BlueEdge Crafts - golf ones are here .