Saturday, December 28, 2024

Happy New Year

Time for another crafting session!  The Cricket is on the TV, air-con on, nibbles and wine is flowing ... what more could a girl want!
 
I am very late with my December swap cards for CraftMad Swappers :)

Card#1 - Merry Christmas
 
Using a Kraft cardbase, ribbon was added across the middle with glue, Scrap Boys 'Christmas Day' DP was die-cut using WaffleFlower A6 Layer dies and added to cardbase.  KaiserCraft Christmas Tree was stamped on green cardstock, heat embossed with VersaMark & clear embossing powder, then die-cut with a slightly smaller Waffle Flower A6 Layer die.

A final touch of bling added at bottom of card.   I couldn't find the right sentiment stamp, so I used my new T-square ruler and wrote it by hand.
 

This card was inspired by a 2016 Sketch from my CraftMad swap group.


Card#2 - Happy New Year
 
Using my own handmade stencil cut with Spellbinders circle dies, I ink blended some random 'bubbles', highlighted with white gel pen for the background, which was then trimmed with Waffle Flower A6 layer dies, and added to Navy cardbase.


SugarPea 'Cheers to You' Champagne bottle and glasses stamped in black and clear heat embossed, hand coloured with Copics, then die cut with matching dies, placed strategically on cardfront with foam tabs.  Gold PeelOff stickers '2025' added, and a final touch of Kindy Glitz added for sparkle.

This Card was inspired by the CraftMad Swappers December TicTacToe - Diagonal Down L-R - Numbers, Gold, Sparkle


Linking Card#2 with the following challenges:


Thank you for visiting my blog today - I hope you have a good day.
Remember, any day doing something you love makes it a good day ;-)
Doing what you like is freedom. Liking what you do is happiness.


Monday, December 23, 2024

Happy Birthday, Happy Anniversary, Happy Birthday

It's time for the in-laws birthday & anniversary celebrations.
 
Card#1 - Birthday card for Sister-in-law Rosa

I had a play with my Uniquely Creative Cake Builder Stamp & Die Set.  Cake elements were stamped on 210 gsm cardstock in Versafine Ink, hand coloured with watercolour pencils and cut out with matching dies.

 
The background stamp is Couture Creations 'Star Burst' stamped on 210 gsm cardstock with Versamark Ink and heat embossed with Holographic Embossing Powder that I have had in my stash for as long as I can remember - I don't use it very often, as it doesn't always stick very well, and tiny specks of glitter come off if you handle it too much :( The background was trimmed to make the cardfront, then added to 300gsm cardbase using foam tape. 

 
The cake elements were then layered strategically on the cardfront with a combination of foam tape & double-sided tape for added dimension.
 
Linking Card#1 with the following Challenges
 

Allsorts Challenge -Week 812/3 - use your dies


Card#2 - Wedding Anniversary Card

I used up some more of the gorgeous Spellbinders Be Bold Blooms die-cuts I had pre-cut in a previous crafting session.  I am loving this Blue/Yellow/White combination.
 
Card#3 - Birthday Card for brother-in-law Greg

I had some fun cutting out records and squares from my stash of colour cardstock and placing in a fun layout.  I love the sentiment .....
 
Linking Card#3 with the following Challenges
AAA Cards #280 - sketch - I have rotated the sketch


Thank you for visiting my blog today - I hope you have a good day.
Remember, any day doing something you love makes it a good day ;-)
Doing what you like is freedom. Liking what you do is happiness.


Sunday, December 22, 2024

Noel, Joy, Merry.....

Here are are few more Christmas Cards I managed to make this year - quite pleased with myself!

I bought some digital images a while back from RAM Stamps (Rachelle Anne Miller) and I thought it was about time I used them.  I must say, they have been a pleasure to use and to colour in.
 
Card#1
RAM Christmas Noel Image printed onto 210gsm cardstock, coloured in with Copics, highlights with Kindy Glitz.  Handmade background ruling lines with Copics.  Centre panel cut with Spellbinders Deckle edge dies & edges highlighted with Kindy Glitz and added to cardfront using foam squares. 
 
Card#2
RAM Christmas Joy Image printed onto 210gsm cardstock, coloured in with Copics, highlights with Kindy Glitz.  Green DP used for a background.  Centre panel cut with Spellbinders Deckle edge dies & edges highlighted with Green Copics and added to cardfront using foam squares.

Card#3
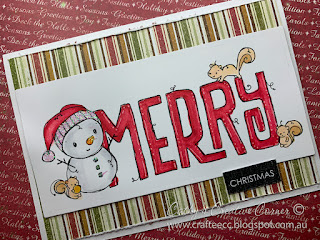
RAM Christmas Merry Image printed onto 210gsm cardstock, coloured in with Copics, highlights with Kindy Glitz.  Striped DP used for a background with edges 'stressed' to add interest.  Centre panel cut with Rectangle Dies and added to cardfront using foam squares.
 
Card#4
RAM Australian Birds Image printed onto 210gsm cardstock, coloured in with Copics, highlights with Kindy Glitz.  DP used for a background.  Centre panel cut with 'scalloped edge' die and added to cardfront using foam squares. 
 
Card#5
I created a background in Photoshop, printed onto 210gsm cardstock, and foiled with 'Mini Minc' in Red foil.  The RAM Kangaroo Christmas Surprise image was printed onto 210gsm cardstock, coloured with Watercolour Pencils, highlights with Kindy Glitz.  Image was then fussy cut, and added to cardfront with foam squares.
 
Linking the following cards with the following challenges
 
Card#2
 
Card#3
 
 
Card#4
Critter Crazy Challenge #93 - Anything goes with a critter
 
Card#5


Thank you for visiting my blog today - I hope you have a good day.
Remember, any day doing something you love makes it a good day ;-)
Doing what you like is freedom. Liking what you do is happiness.


Tuesday, December 17, 2024

Ho Ho Ho, Merry Everything

Here is another card I made recently with the abundant supply of alphabet letters I die cut the other day!


I die cut a series of letters out of Plaid DP and layered onto white cardstock for dimension. 


I used my new 'T square' ruler to align the letters, before affixing with foam tape to red background cardstock.  Gold Peel Off stickers were randomly added to the background, 'Merry Everything' sentiment stamped on 210gsm white cardstock, cut out and added to red background with foam tape.  The background was then affixed to a white A6 300gsm cardbase.
 
AND .... we have another 'dancing' Santa :) stamped on 210gsm white cardstock and hand coloured with Copics, fussy cut with scissors, highlighted with Dimensional paint, then affixed with a wobble (see video below).


I have really enjoyed making this selection of Christmas Cards, even though the lettering took way more time than I expected to LOL
 
Linking with the following challenges:
As You Like it Challenge - Anything Christmassy
Creative Knockouts #536 - Time to be Merry 


Thank you for visiting my blog today - I hope you have a good day.
Remember, any day doing something you love makes it a good day ;-)
Doing what you like is freedom. Liking what you do is happiness.


Saturday, December 14, 2024

Merry Christmas

Here are a few Christmas Cards I have made recently.

In a recent post, here, I shared that I needed some new Cuttlebug Plates as my old ones had cracked.

Well, I put the new plates to the test and they performed beautifully!
 
I made up two DL size cards for something different!  (which is two-thirds of an A4 sheet)
 
Card#1
 
I die cut a series of letters out of Plaid DP and layered onto white cardstock for dimension. 

 
I used my new 'T square' ruler to align the letters, before affixing with foam tape to red background cardstock.  Gold Peel Off stickers were randomly added to the background, along with a mulberry paper poinsettia.  The background was then affixed to a white DL size cardbase.

Card#2

Again, I used my new 'T square' ruler to align the letters, before affixing with foam tape -- oops, the 'a' has a bit of a 'lean' LOL.  Gold Peel Off stickers were randomly added to the red background cardstock, then affixed to a white DL size cardbase. 


AND .... we have a 'dancing' Santa :) stamped and hand coloured with Copics, fussy cut with scissors, highlighted with KindyGlitz, then affixed with a wobble (see video below).


Must go, I have more Christmas cards on my to do list!
 
Linking Card #1 with the following challenges:
Cardz4Guyz Challenge #362 - Holiday/Christmas Tag/Card 
The Male Room #193 - Anything Goes
 
 
Linking Card #2 with the following challenges:
Christmas Kickstart Challenge #93 - Anything Goes - If it's Christmassy link it up! 
Sparkles Christmas Challenge #167 - Feature a Christmas Song or Carol - I am not so much into Christmas Carols, but I love Slade's 'Merry Christmas Everyone'  LOL  The song was released in 1973 and I play it nice and loud whenever I can :)
Cut It Up Challenge #319 - Use more than one die cut - well I think I got that one covered.  I confess, I didn't think making up the word Merry Christmas would be so fiddly, and take as long as it did!
ABC Christmas Challenge Y - Favourite Color - My most fave Christmas colour is Red combined with gold!

 
Thank you for visiting my blog today - I hope you have a good day.
Remember, any day doing something you love makes it a good day ;-)
Doing what you like is freedom. Liking what you do is happiness.


Sunday, December 8, 2024

Thank You

I have a few new cards to share today.

A Thank You card ..... made with bits & pieces from my stash - the only thing new is the sequins.

The background was part of a swap from many years ago, where we swapped a selection of embossed backgrounds in A6 size.  It doesn't show up in the photo very well, but the brown cardstock is the most beautiful chocolate brown :)
 
Embossed background trimmed, twine wrapped around and glued in place, then added to cardfront with foam tape.  
 
'Thank You' Sentiment was stamped & die cut twice for dimension, then added to cardfront with foam tape and a final touch of sequins for that 'little something'.  

Linking above card with:
Cardz 4 Guyz #361 - Grateful/Thankful/Blessed 


Card#2

Still with the frame of mind of clearing stash, my Second card is repair/rehash of an older card I made some time ago for a friend, but decided to go a different direction.
 
I did a bit of a watercolour wash using a fan brush for the background, then stamped the dandelions in black, then added a touch of bling.

 
The 're-hash' was re-affixing the cardfront to a better black cardbase.  The cardstock I had used for the watercolour was not my best choice and it had warped a little bit, re-affixing it to a stronger cardbase helped straighten it a bit ..... well sort of.
 
 
Thank you for visiting my blog today - I hope you have a good day.
Remember, any day doing something you love makes it a good day ;-)
Doing what you like is freedom. Liking what you do is happiness.


Sunday, December 1, 2024

Cuttlebug down!

I had a bit of a calamity a few weeks ago ...... my Cuttlebug C Plate cracked 
 
**insert sad face**
 
.... then the more I used it, the more it cracked, then finally it became unusable. 
 
**insert very sad face** 
 
So the search began to find a replacement plate .... 
 
**insert surprised face**
 they don't make Cuttlebug any more!!! ...  
 
I have had my Cuttlebug since about 2008 and it has been the most reliable crafting tool ever!  I was absolutely astounded to see the price of replacement machines on the market now!

Thankfully, I was able to find a replacement set of plates on Amazon, so I took the opportunity to replace my B Plates too, as they were quite worn and had a definite 'bow' to them.

 
Shiny new plates!
 

Now back to my cardmaking ..... I need to pull my finger out for Christmas Cards.


Thank you for visiting my blog today - I hope you have a good day.
Remember, any day doing something you love makes it a good day ;-)
Doing what you like is freedom. Liking what you do is happiness.


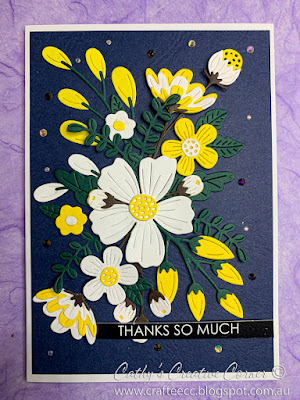
Saturday, November 16, 2024

Thanks so Much

Having another play with my new Spellbinders Be Bold Blooms dies ..... 
 
I am really enjoying playing with these dies and die cuts.


I started with rummaging through my offcuts/snippets ..... and made a selection of colours that I thought might work well.  I die-cut the flowers and leaves multiple times in multiple colours and then set about making up various combinations of flowers, stems and leaves.

The background is left over from a previous card - I think that might be the last of the gorgeous dark blue. I used the Waffle Flower A6 Layers die to cut the cardfront to the perfect size.  

Playing with the layout is lots of fun. 
 
A final touch of bling added randomly around the card ...... if you call playing with the positioning for a good 5 minutes before deciding on final layout random LOL
 
I am really pleased with the way this card turned out .... especially considering it is made entirely with snippets/offcuts (except the white 300gsm cardbase).
 
Linking this card with the following challenges:

Thank you for visiting my blog today - I hope you have a good day.
Remember, any day doing something you love makes it a good day ;-)
Doing what you like is freedom. Liking what you do is happiness.


Hello there

Time for another swap card - my October swap - which was late ..... again :(

1 card using stamps
1 card using the TicTacToe

Card #1 was made using a combination of stamps and patterned paper.  I have been going through my stash in an endeavor to use up what I have.

I had made several 'card topper' elements a while back using some stamps and designer papers, so I decided to utilise these elements.

The 'dancing lady' was stamped onto DP and 'paper pieced' onto square card topper, bordered by Green Pearl cardstock, all cut with Spellbinders Square dies - I love the fact they fit together so nicely.  The left panel was made by layering DP onto pearl cardstock, then attached to the front of the card with double sided tape.
 
Sentiment was stamped then cut out with Spellbinders Ovals, layered onto green pearl cardstock oval - added to front of card with 3D foam dots.

 
The square topper was added to front of card with 3D foam dots and a final touch of 'kindy glitz' added to image, and 3 gems added to bottom.
 
A very simple card which came together fairly quickly..... once I had gathered all the elements.  The colour scheme was influenced by the TicTacToe card.


Card #2
Using TicTacToe - bottom row across - Yellow/Birds/Embossed Panel

In my stash I found an embossed panel - I do believe it was from a swap I did many years ago where we sent and received a selection of embossed card fronts.

I lightly swiped yellow ink across the raised bits.  I was going to add the embossed panel directly to the front of the cardbase, but it didn't look right.  I then thought about adding it to a yellow layer .... yes!   

So I trimmed the panel slightly smaller, then because of an oopsie where I forgot to put the lid back onto my black ink ........ I had to rescue it by swiping black ink around all of the edges .... 

 
The bird image was a freebie stamp included in an Ultimate Crafts Magazine.  It was stamped in black, heat embossed and then coloured in using Copics. 
 
It is certainly not quite what I had in mind when I started, but it is a finished card and has been now received by my swap partner.
 
Linking Card #2 with:


Thank you for visiting my blog today - I hope you have a good day.
Remember, any day doing something you love makes it a good day ;-)
Doing what you like is freedom. Liking what you do is happiness.