Friday, March 31, 2023

Happy Easter

I felt like doing some foiling and Copic colouring today.
 
 
I love this 'easter tree' digi stamp from LOTV - my Sister-in-law has an 'easter egg tree' ornament that she puts on display each year - so that is who I am going to give this card to.
 
I printed digi stamp and the sentiment 'Happy Easter' using a font called 'Tinker Toy' with the Laser Printer. The sentiment was foiled in Gold and the digi stamp was foiled in Green.
 
I then coloured the image with some lovely pastel shades using my Copic Markers.
 
 
The cardfront was trimmed down to fit on a DL sized cardbase, and a final touch of bling added.
 
I really like the simplicity of this one - nice and easy to put in the mail too!
 
I have been inspired by quite a few challenges for this card.  
 
The As You Like It challenge asks us to nominate what is our fave - People or Animals.  I think it has to be Animals .... hands down!  They are such fun to colour in!

Several other challenges have Easter as the theme and these have influenced my colour choices.


Linking With the following challenges:
Sweet Stampin - Easter
As You Like It - People or Animals
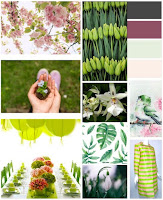
Just Add Ink - #646 - Photo inspiration

ITEMS USED

Stamps/Dies:  LOTV Digi Stamp 'easter tree'
Inks:  Copic Markers
Tools: Laser Printer, Mini Minc, fancy rotary blade/cutting matt


Thank you for visiting my blog today - I hope you have a good day.
Remember, any day doing something you love makes it a good day ;-)
Doing what you like is freedom. Liking what you do is happiness.


Sunday, March 19, 2023

Mum

It will be Mother's Day on the 2nd Sunday in May for us here in Australia, and whilst it has been many years since Mr Fixit and myself lost our Mums, my Mum has been on my mind of late..... so I made a card for her 💗

 
I had another play with the Altenew BAF Lavender stamp & die set.  When I first used this set, I found it a little difficult to line up the stem exactly if you wanted to die cut the whole flower .... so I found a work around!    I die-cut first!   LOL
 
I cut out as many flowers as I needed.  I kept one of the 'background' holes and placed it in my Couture Creations Stamping Platform, then placed the die-cut in the hole.  Using the stamping platform, I was then able to align the stamps exactly where needed.   This was really useful for doing a batch of flowers at the same time.  The process is:  stamp the first layer, remove die-cut, then place a new die-cut in the hole, re-ink & stamp again.  Then when ready for second layer, line up second layer & repeat the process. 
 
Once I had finished stamping a batch of flowers, I could then get down to the layout of the card.  I wanted it fairly simple ....... so an ink spattered background using the same colours from the flowers seemed just right.
 
 
The flowers were arranged and attached at slightly different layers using foam dots.  'MUM' was die-cut in white cardstock and ink blended with a brush using the darker purple ink and the 'shadow' was die-cut out of vellum.

A tiny splattering of 'Kindy Glitz'/Stickles' was the final touch!

I think that our Mums would have loved a card like this.
 
--oo0oo--
 
Linking With the following challenges:
The Flower Challenge #78 Stencils or Dies


ITEMS USED

Stamps/Dies:  Altenew BAF Lavender, MUM (unbranded)
Inks:  Colorbox Pigment Inks, Ranger Distress Inks
Tools:  Cuttlebug, Couture Creations Stamping Platform
Embellishments:  Kindy Glitz/Stickles
Cardstock/papers:  250gsm white, Vellum


Thank you for visiting my blog today - I hope you have a good day.
Remember, any day doing something you love makes it a good day ;-)
Doing what you like is freedom. Liking what you do is happiness.


Noel

I have a new card to share today.
 
A little while back, I left a comment on Christina Griffiths' Blog and I won a prize - it was a Die Cutting Essentials magazine, which included a free die set.

It took a little while to get here .... all the way from the U.K. and this weekend I have had time to have a quick play. 
 
 
Inspired by the Freshly Made Sketches Challenge #577, I used the snowflake & Noel from this free set and combined it with a Spellbinders Snowflake I already had. I die cut everything from silver holographic card & layered with black card to add dimension.  A strip was cut from black leathergrain cardstock scaps.  I thought the plain white background was a bit too plain, so I used some black, grey & silver inks to do some paint splatters, with a final touch of teeny tiny stars for some bling.
 

A Christmas Card fits in with the Happy Little Stampers AG Christmas Challenge , and the Christmas Crafts All year Round March Challenge of '3 red hens' or 3 of anything dictated the number of snowflakes .... all in all, the card came together relatively quickly.


The 52 Christmas Card Throwdown March Challenge of Black & Silver inspired my choice of colours, but sadly, I was too late to link my card up  (I will leave the link anyway - go visit and check it out)


Thank you again, Christina, I love visiting your blog and seeing your work.  I think I will enjoy playing some more with this die set.
 

ITEMS USED

Stamps/Dies:       Die-cutting Essentials Christmas Pillowbox Die Set, Spellbinders Snowflake
Inks: Distress Inks - Black, Grey, Silver
Cardstock:  White 300gsm, Black Leathergrain, Silver Holographic
Tools:  Cuttlebug


Thank you for visiting my blog today - I hope you have a good day.
Remember, any day doing something you love makes it a good day ;-)
Doing what you like is freedom. Liking what you do is happiness.


Saturday, March 4, 2023

Thank You for all you do!

I have had a very busy week of spring cleaning.  It is actually the start of Autumn for us here is Australia, and I was motivated by the slightly cooler weather!  So today, I gave myself the day off and I have been playing in my Craft Room! 
 
Card #1 - Pink

I stamped up the flowers from Altenew BAF Coneflower using Versafine Onyx Black and heat embossed with WOW Clear embossing powder.  Flowers were layered using shades of pink/purple and greens, then diecut.  I rumaged through by stash of Scrapbooking cardstock & DP & snippets of cardstock to pick some pleasing colour combinations for the background.   Flower was placed on cardfront with 3D foam dots for added dimension.

The sentiment was stamped with Versafine Onyx Black & heat embossed, die cut twice & layered, then placed on the front of the card with 3D foam.
 
Card #2 - Green & Gold

Followed the same process as Card #1, but this time I chose Greens as the predominant colour.  

The sentiment was stamped with Dark Green ink, die cut with a Spellbinders Tag twice & layered, Gold Cord added to tag, then placed on the front of the card with 3D foam.
 
 
I quite enjoyed making these cards, even though I am really NOT a fan of Green :)  You have to try something out of your comfort zone every now and then!
 
Both of my cards have been inspired by the sketch in Freshly made Sketches #575.

Linking Card #1 with the following challenges:

Cut It Up #272 CAS (clean & simple)
 

Linking Card #2 with the following challenges:


Thank you for visiting my blog today - I hope you have a good day.
Remember, any day doing something you love makes it a good day ;-)
Doing what you like is freedom. Liking what you do is happiness.